How to Build an Agentic AI-Crypto Stack
Set up an agentic AI-crypto stack with compute, wallets, and verifiable execution.

Set up an agentic AI-crypto stack with compute, wallets, and verifiable execution.
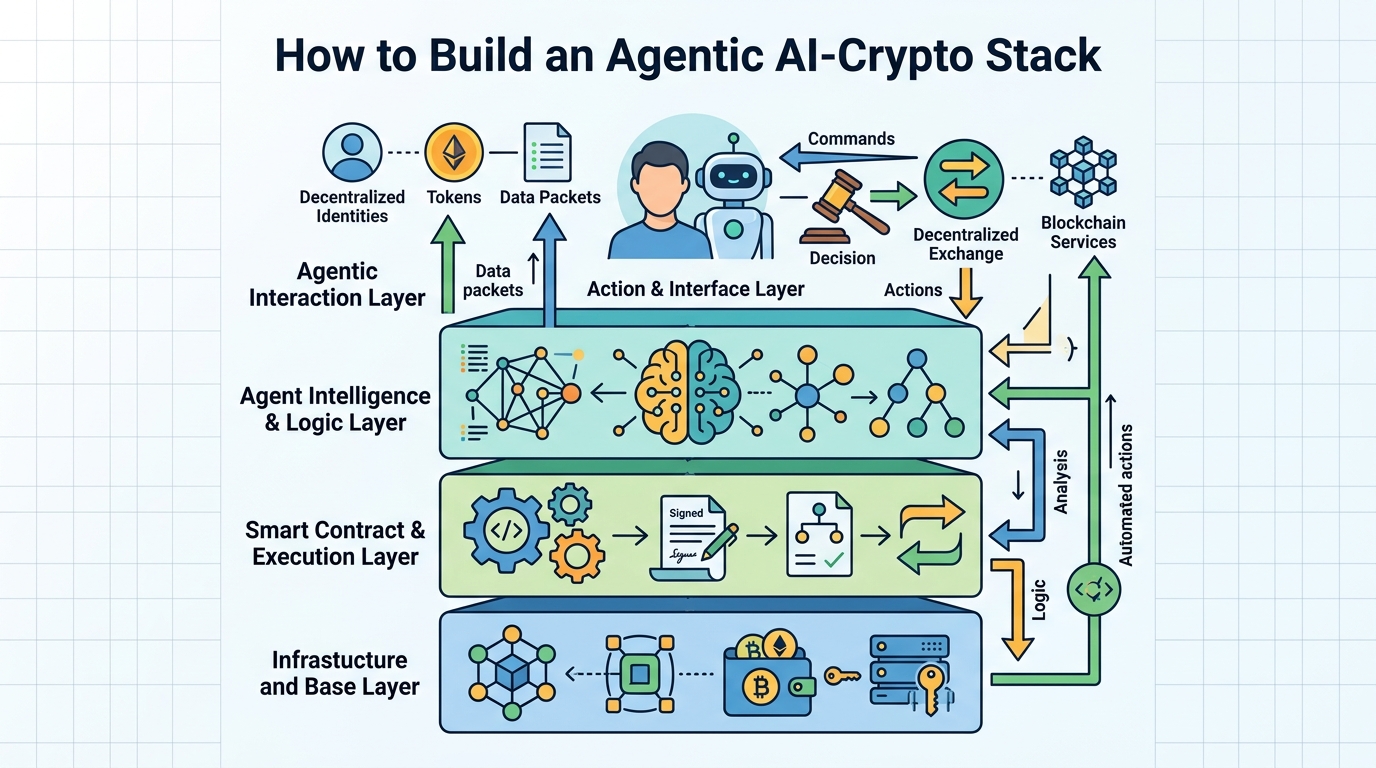
This guide is for developers who want to turn the 2026 AI-crypto thesis into a working system. After you follow the steps, you will have a practical blueprint for an agent that can use decentralized compute, hold a wallet, act on-chain, and add verifiability for regulated workflows.
You will also know where DePIN, agent frameworks, and trust layers fit together, so you can prototype without guessing which tool solves which problem.
Before you start
Get the latest AI news in your inbox
Weekly picks of model releases, tools, and deep dives — no spam, unsubscribe anytime.
No spam. Unsubscribe at any time.
- Node.js 20+
- npm 10+ or pnpm 9+
- A wallet tool such as MetaMask or a programmatic wallet service
- An account with a decentralized compute provider such as Akash Network or io.net
- An agent framework account or repo, such as Eliza
- API keys for model inference, blockchain RPC access, and any messaging channel you plan to use
- Basic familiarity with EVM chains, smart contracts, and JSON
Step 1: Define the agent’s economic job
Your first outcome is a clear agent spec that ties the AI system to a measurable business task, such as routing trades, monitoring DeFi positions, or answering purchase intent in an agentic storefront.

Write down the agent’s inputs, allowed actions, wallet permissions, and stop conditions. Keep the scope narrow so the agent can be tested safely before it touches real funds or customer data.
Agent spec checklist:
- Name: treasury-rebalancer
- Inputs: token balances, yield rates, gas price, risk limits
- Actions: swap, stake, withdraw, alert
- Limits: max 2% portfolio move, human approval above threshold
- Chain: Ethereum mainnet or testnet
You should see a one-page spec that names the agent, the protocols it can call, and the exact conditions for human approval.
Step 2: Provision decentralized compute
Your second outcome is a live inference environment that does not depend on a single cloud vendor and can scale with demand. This is where DePIN fits: it gives your agent access to GPU capacity for model calls, retrieval jobs, or batch scoring.
Create an account with a provider, choose a cluster or marketplace listing, then deploy a small inference workload first. If you need lower cost, start with a reverse-auction style marketplace; if you need enterprise hardware, choose a provider that advertises dedicated H100 or A100 capacity.
You should see a running endpoint, a healthy node status, and a successful test prompt returning a model response with acceptable latency.
Step 3: Connect a wallet and transaction policy
Your third outcome is an agent wallet that can sign transactions only within the rules you define. The goal is not full autonomy on day one, but controlled autonomy with traceable permissions.
Use a dedicated wallet for the agent, separate from human operator funds. Add policy checks for spend limits, protocol allowlists, and time-based approvals. If your stack supports it, bind the wallet to a human sponsor record so you can trace accountability later.
You should see the wallet funded with test assets, a successful dry-run signature, and a failed transaction when you intentionally exceed the policy limit.
Step 4: Wire the agent framework to on-chain actions
Your fourth outcome is an agent runtime that can reason, choose a tool, and complete an on-chain workflow end to end. Frameworks like Eliza are useful here because they combine memory, identity, and multi-channel interaction in one system.
Install the framework, configure model access, then register tools for balance checks, swaps, transfers, and notifications. Keep the first workflow simple, such as reading a balance and posting a signed alert, before allowing asset movement.
npm install
cp .env.example .env
# add RPC_URL, PRIVATE_KEY, MODEL_API_KEY
npm run start
You should see the agent boot, load its tools, and complete a test action such as reading wallet state and posting a response in your chosen channel.
Step 5: Add verifiability and privacy controls
Your fifth outcome is a system that can prove what happened without exposing more data than necessary. This is where ZKML and FHE become relevant for high-trust workflows in finance, healthcare, or any regulated environment.
Use ZKML when you need to prove that a model output came from a specific model or pipeline. Use FHE when the model must process sensitive data without directly revealing it. Start by applying one control to one critical path, rather than trying to make every component private at once.
You should see a verifiable proof artifact, a logged model version, or an encrypted inference path that your audit process can inspect without exposing raw inputs.
Step 6: Measure the agent’s business outcome
Your final outcome is a dashboard that shows whether the agent creates value instead of just activity. Track the metrics that match the job you defined in step 1, such as cost per task, success rate, execution latency, or revenue attributed to agent actions.
Run the agent in a sandbox or limited production lane, then compare it with the manual baseline. If the agent is for commerce, track conversion and time to purchase. If it is for treasury, track yield, slippage, and failed transactions.
You should see a repeatable report showing baseline versus agent performance, plus a clear decision on whether to expand, tune, or pause deployment.
| Metric | Before/Baseline | After/Result |
|---|---|---|
| Workflow execution | Manual operator steps | Automated agent run with policy checks |
| Compute source | Single cloud GPU | Decentralized compute marketplace |
| Transaction safety | Ad hoc approvals | Wallet policy and sponsor traceability |
| Data handling | Plaintext processing | ZKML proof or FHE-protected inference |
Common mistakes
- Giving the agent broad wallet access on day one. Fix: start with a test wallet, low limits, and a strict allowlist.
- Skipping the compute benchmark. Fix: test latency and reliability on one workload before moving to production traffic.
- Adding privacy tooling too late. Fix: decide early whether you need ZKML, FHE, or both, then design the data path around that choice.
What's next
From here, deepen the stack by adding agent identity standards, richer memory, and protocol-specific integrations for DeFi, commerce, or enterprise data workflows. If you want the system to operate at scale, review the docs for your chosen framework, compute network, and proof layer, then harden the policy and audit pipeline before expanding autonomy.
// Related Articles
- [AGENT]
Perplexity should build Teammate as a coding agent, not a copilot
- [AGENT]
HP adopts OpenAI Frontier across global operations
- [AGENT]
Build a production vector DB for RAG
- [AGENT]
Ornith-1 turns agent coding into a server
- [AGENT]
Crypto AI agents are useful, but only for narrow workflows
- [AGENT]
AI Agents in Crypto: 2026 Protocol Guide