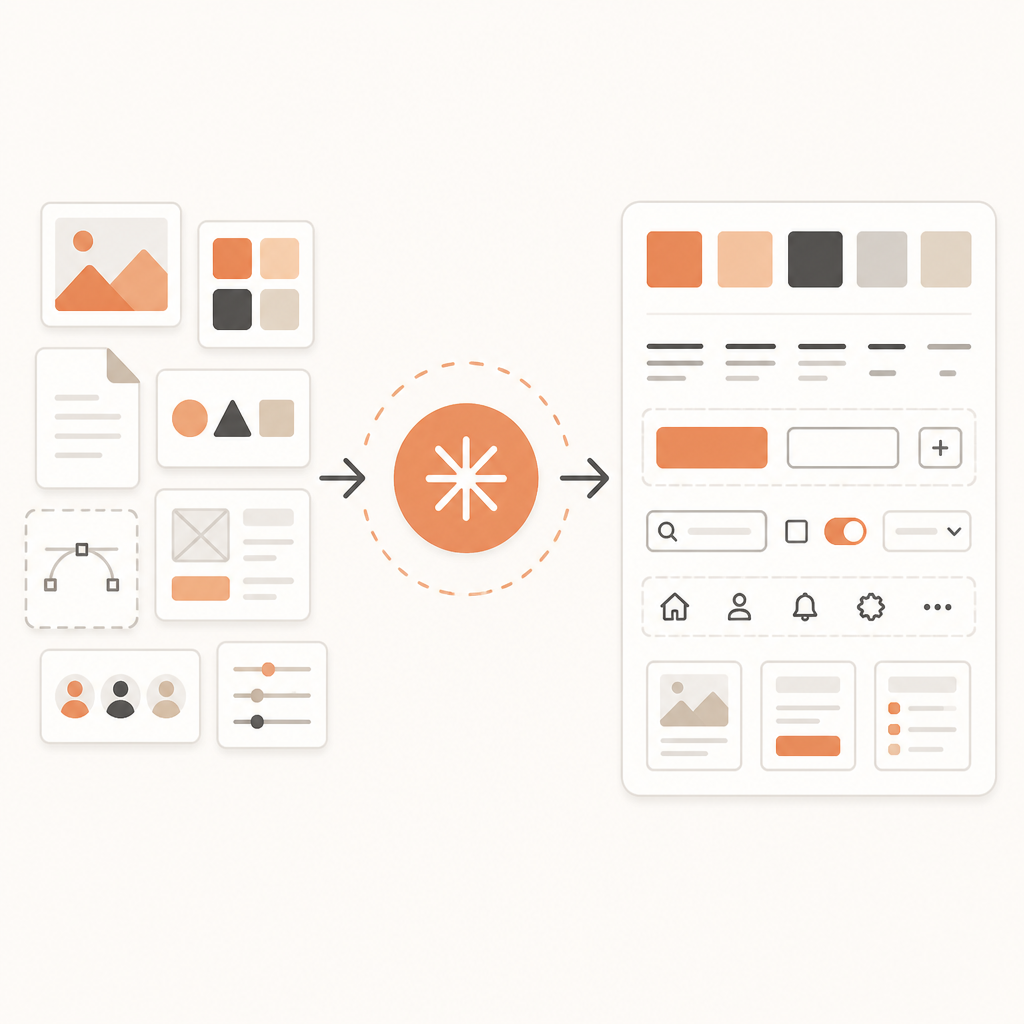
Claude Design turns assets into a team design system
I break down Claude Design’s setup flow and give you a copy-ready template for building and updating a team design system.

Claude Design turns brand assets into a reusable team design system.
I've been using design systems long enough to know when a setup flow is pretending to be simpler than it is. Usually the tool asks for “your brand,” then hands you a blank canvas and a vague hope that colors, spacing, and components will magically sort themselves out. They don’t. You end up with a pile of half-right tokens, a button style nobody wants to touch, and a team that still ships one-off UI because the system never felt trustworthy.
That’s why the Claude Help Center guide for setting up a design system in Claude Design caught my attention. It’s not trying to sell me on a grand theory. It’s basically saying: give Claude your real assets, let it extract the reusable parts, then keep refining until the output matches your brand. That’s a lot more honest than the usual “just define tokens” hand-waving. Claude Design is in beta for Pro, Max, Team, and Enterprise plans, and the setup is meant for the designer or brand owner who will own the system once. That part matters, because design systems die when nobody owns the boring middle.
Start with assets, not aspirations
Get the latest AI news in your inbox
Weekly picks of model releases, tools, and deep dives — no spam, unsubscribe anytime.
No spam. Unsubscribe at any time.
“It extracts reusable components, colors, typography, and patterns from the assets you provide—codebases, slide decks, or other design references—and uses them as the foundation for every project created within your account.”
What this actually means is that Claude Design is not asking you to invent a system from scratch. It wants evidence. Real screens, real components, real brand material. If you give it a React component library, it can read the structure. If you give it a slide deck, it can infer the visual language. If you give it a logo and a palette file, it can at least start with the obvious tokens.

I’ve seen teams waste days trying to write the “perfect” design system spec before they’ve even agreed on the source of truth. That usually turns into a fight between the Figma file, the marketing site, and whatever the frontend team actually shipped six months ago. Claude’s approach is more practical: feed it what already exists, then let it synthesize the patterns.
How to apply it: pick one primary source first. If your product UI lives in code, use that. If your brand is strongest in marketing pages, use a finished page or deck. If you have both, even better. The point is to reduce guesswork. Claude can only extract what’s there, so the cleaner your source material, the less cleanup you’ll do later.
- Best source for product teams: a component library or design system repo
- Best source for brand teams: a polished deck, PDF, or landing page set
- Best source for mixed teams: a combination of code, screenshots, and brand assets
Set up the organization once, then stop repeating yourself
The guide says you create or switch to your organization in Claude Design, then complete onboarding. That sounds minor, but it’s the core of the whole thing. This is not a per-project experiment. It’s an organization-level setup that becomes the default for everyone on Team and Enterprise plans once it’s published.
That changes the way I think about the work. Instead of asking, “How do I make this one mockup look good?” I’m asking, “What should every new project inherit automatically?” That’s the right question if you’re trying to stop style drift. It also means the setup belongs to the person who understands the brand rules, not the person who just happens to be available that afternoon.
I ran into this exact problem with internal tools work: every new project started with a slightly different button radius, a different grayscale scale, a different opinion about headings. Nobody was being malicious. They were just starting from empty. Claude Design’s organization flow is trying to remove that empty-start problem.
How to apply it: decide who owns the design system before you upload anything. If your team is small, that might be the lead designer or frontend lead. If you’re in an enterprise setup, it’s usually a brand owner plus an admin who can grant permissions. Don’t let five people “help” at the same time unless you enjoy inconsistency.
- Confirm admin permissions first
- Choose one owner for edits and publishing
- Keep the organization name aligned with the actual team using it
Upload real examples, not just a style guide
The help article is pretty direct here: include real examples, not just specs. That line is doing a lot of work. A color palette tells Claude what blue is. A finished landing page tells it how blue behaves in a real layout, next to real typography, with real spacing and hierarchy. That’s the difference between a token list and a usable system.
Claude suggests several asset types: codebases, prototypes, slide decks, documents, and individual brand assets like logos and typography specimens. I like that range because it matches how messy actual teams are. Not every company has a pristine design system repo. Some have a PDF from a rebrand, a Figma export, and a frontend app that’s “mostly correct.” Fine. Feed the model the best evidence you have.
What this actually means is that you should optimize for coverage, not perfection. One source can get you started, but multiple sources give Claude more to compare. That’s especially useful when your brand has a gap between “official brand” and “what the product team actually uses.” The model needs enough material to infer the stable parts.
I’ve always preferred systems that can survive imperfect inputs, because that’s reality. Nobody has a neat archive where every component, every font weight, and every spacing rule is documented and current. If you do, congratulations, you’re the exception. For the rest of us, the practical move is to upload the strongest evidence and then test whether the generated kit behaves like the brand you meant to build.
How to apply it: use a small asset bundle with variety. Don’t upload ten near-identical screenshots. Upload a homepage, a dashboard, a presentation slide, and the brand palette. If your codebase includes a component library, include that too. You’re trying to teach the system the shape of your brand, not just one screen.
Test the output with prompts that expose the weak spots
After upload, Claude generates a design system UI kit for the organization. The article says it typically includes colors, typography, components, and layout patterns. That’s nice, but the real test is whether the system holds up when you ask for something specific and slightly annoying.
The guide suggests test prompts like: “Create a landing page for [your product].” “Design a dashboard showing [relevant metrics].” “Make a presentation about [a topic your team commonly presents on].” I think that’s the right idea because generic prompts hide problems. A landing page will tell you whether hierarchy is right. A dashboard will show whether spacing and component reuse are sane. A presentation will expose whether the typography system survives long-form structure.
What this actually means is that you should test for the kinds of work your team actually does, not for a demo screenshot. If your team ships dashboards, don’t validate the system with a marketing hero section and call it done. If your team makes decks for sales or executives, test slide output. The system should earn trust in the context where it will be used.
I usually look for three things when I validate a system like this: whether colors stay consistent, whether headings feel like they belong to the same family, and whether components repeat instead of mutating into weird one-offs. If any of those drift, the extraction needs more input or a better source.
How to apply it: make a tiny validation checklist before you publish. Use the same three or four prompt types every time so you can compare changes. That gives you a repeatable way to judge whether an update improved the system or just changed it.
- Does the output use the right color hierarchy?
- Do headings, body text, and labels feel consistent?
- Do repeated components stay repeated, or do they mutate?
- Does the layout match the way your team actually ships work?
Publish only when you’re ready for everyone to inherit it
Claude Design doesn’t just keep the design system private to the person who set it up. Once you switch on the “Published” toggle, projects created from the Claude Design homescreen inside your organization use that system instead of the default. That is the moment where the setup stops being a draft and starts affecting everyone.
That’s why I’m a little skeptical of teams that rush this step. If the system is only 80 percent right, publishing it too early just spreads the pain. But if it’s good enough and consistent enough, publishing saves a ton of repetitive setup work. It also gives new projects a sane starting point, which is half the battle in any internal design workflow.
The important detail from the guide is that publishing is tied to the organization, not just the individual project. That means the choice has operational weight. You’re not just approving a file. You’re changing the default behavior for future work.
How to apply it: treat publishing like a release. Review the generated kit, validate it with real prompts, and only then flip the switch. If you’re on Team or Enterprise, tell the team what changed so nobody thinks the new output is “random Claude behavior.” It isn’t random. It’s now your default.
One more practical note: if you’re in Enterprise, the feature is default off. So don’t assume it’s already active just because your account has access to Claude. Check the organization settings and permissions first, otherwise you’ll waste time looking for a toggle that was never enabled.
Remix the system instead of starting over
The update path in the article is the part I like most. From organization settings, you click Open next to the design system you want to edit, then click Remix in the upper right corner to open the chat interface on the left side of the window. That’s a much better mental model than “delete and rebuild.”
What this actually means is that your design system is meant to evolve through conversation. Brands change. Products mature. Typography gets tightened. Colors get adjusted. If the only path is a full rebuild, nobody will update anything until the system is obviously broken. That’s how stale systems happen.
I’ve had to babysit old systems where every update felt like a migration project. Nobody wanted to touch them because any change meant breaking ten downstream assumptions. A remix flow lowers the cost of correction. You can ask Claude to change the system, then inspect the result instead of throwing away the whole kit.
How to apply it: use remixing for incremental fixes, not emergency overhauls. If your button style is slightly off, adjust it. If your typography scale needs tightening, adjust it. If your brand direction has changed completely, then you may need a bigger reset, but most updates are smaller than teams make them out to be.
This is also where ownership matters again. If nobody knows who can remix the system, updates will stall. Put one person on the hook for changes, and make sure that person has enough context to decide when “close enough” is actually enough.
The template you can copy
# Claude Design system setup checklist

## 1) Pick the owner
- Name the designer, brand owner, or frontend lead responsible for setup
- Confirm organization admin permissions are available
- Decide who approves publishing

## 2) Gather source material
Use at least one strong source, ideally more:
- A codebase with the component library
- A slide deck or PDF that reflects the brand
- Existing product screenshots or prototypes
- Brand assets: logo, palette, typography specs

## 3) Create or switch to the organization
- Open Claude Design
- Select the correct organization in the lower-left project picker
- Complete onboarding

## 4) Upload the assets
- Prefer real examples over specs alone
- Include finished pages or screens, not just tokens
- Add multiple asset types if the brand exists across product and marketing

## 5) Review the generated system
Check for:
- Color palette consistency
- Typography hierarchy
- Reusable components
- Layout patterns and spacing

## 6) Validate with real prompts
Run the same tests every time:
- Create a landing page for [product]
- Design a dashboard showing [metrics]
- Make a presentation about [topic]

## 7) Publish when ready
- Switch on the Published toggle only after review
- Confirm new projects in the organization use the system
- Tell the team what changed

## 8) Update later with Remix
- Go to organization settings
- Click Open next to the design system
- Click Remix to open chat
- Ask Claude to adjust the system instead of rebuilding it from scratch

## 9) Quick validation checklist
- Does the output match the brand voice visually?
- Are colors, type, and spacing consistent?
- Do components repeat instead of drifting?
- Does the system support the work your team actually ships?
That’s the practical version I’d hand to a team that wants to get moving without turning setup into a six-week committee project. It’s simple on purpose: choose ownership, feed Claude the real assets, validate with real work, then publish and keep iterating.
If you want the original instructions, start with the Claude Help Center article. I’ve reorganized the steps and added the operational bits I wish every setup guide included. The source is Claude’s documentation; the framing, checklist, and workflow notes here are mine.
// Related Articles
- [TOOLS]
Deploy MiniMax M3 with vLLM OpenAI API
- [TOOLS]
Namastack turns outbox pain into reliable events
- [TOOLS]
VS Code turns a folder into a workspace
- [TOOLS]
Midjourney Medical turns scans into a spa
- [TOOLS]
Three multimodal models now work in Claude Code
- [TOOLS]
PyPI now accepts WASM wheels for Pyodide